To reset a MacBook Air to its factory settings without a disc, follow these steps precisely. (INTRODUCTION) If you want to restore your MacBook Air to its original settings and don’t have a disc, don’t worry.
There’s a straightforward process you can follow to achieve this. Whether you’re planning to sell your laptop or fix software issues, resetting your MacBook Air can help. This guide will walk you through the steps to reset your MacBook Air to factory settings without using a disc.
By following these instructions carefully, you can have your MacBook Air back to its original state in no time. So, let’s get started and learn how to reset your MacBook Air without a disc.

Credit: m.youtube.com
Backing Up Your Data
Before resetting your MacBook Air to factory settings without a disc, it’s crucial to back up your data to ensure you don’t lose any important files or documents. Taking the time to protect your data is an essential step in this process. There are several methods available for backing up your data, including using Time Machine, iCloud, or external storage.
Using Time Machine
The Time Machine feature on your MacBook Air is a handy tool for backing up your files and restoring them easily. With Time Machine, you can create a complete backup of your system on an external hard drive or a Time Capsule.
- Connect your external hard drive or Time Capsule to your MacBook Air.
- Open the Apple menu and select “System Preferences.”
- Click on “Time Machine” and then “Select Backup Disk.”
- Choose your external hard drive or Time Capsule and click “Use Disk.”
- Tick the box that says “Show Time Machine in the menu bar” for quick access.
- Click on the Time Machine icon in the menu bar and select “Back Up Now” to initiate the backup process.
Using Icloud
If you prefer to back up your data to the cloud, iCloud is an excellent option provided by Apple. With iCloud, you can store your files, photos, and other important data securely and access them from any Apple device.
- Ensure you have enough iCloud storage space for your backup. If needed, upgrade your iCloud storage plan.
- Open the Apple menu and select “System Preferences.”
- Click on “Apple ID” and then “iCloud.”
- Tick the box next to “iCloud Drive” to enable it.
- Select the files and apps you want to back up to iCloud.
- Click on the Apple menu again, choose “System Preferences,” and then click on “Time Machine.”
- Tick the box that says “Show Time Machine in the menu bar” for quick access.
- Click on the Time Machine icon in the menu bar and select “Back Up Now” to initiate the backup process.
Using External Storage
If you have an external hard drive or flash drive, you can also back up your data directly onto the storage device. This method allows for easy portability and quick access to your files.
- Connect your external storage device to your MacBook Air.
- Open a Finder window and select your external storage device from the sidebar.
- Create a new folder on the external storage device to store your backup.
- Select the files and folders you want to back up.
- Drag and drop the selected files and folders into the new folder on your external storage device.
- Wait for the file transfer to complete, ensuring all files are copied successfully.
Preparing For Reset
Learn how to reset your Macbook Air to factory settings without using a disc, with these easy step-by-step instructions. Regain control and optimize your device for peak performance.
Preparing for Reset
Before resetting your Macbook Air to factory settings without a disc, it’s important to take some preparatory steps to ensure a smooth process. In this section, we’ll discuss how to sign out of iCloud and other accounts, disable FileVault, and disable Find My Mac. Following these steps will help safeguard your important data and ensure a successful reset.
Sign Out Of Icloud And Other Accounts
Before resetting your Macbook Air, it’s crucial to sign out of your iCloud and other accounts to prevent any data loss or complications. Here’s how you can do it:
- Open your Macbook Air and click on the Apple logo in the top-left corner of the screen. A drop-down menu will appear.
- Select “System Preferences” from the menu.
- In the System Preferences window, click on “Apple ID” to access your iCloud settings.
- On the left-hand side, select “Overview” if it’s not already selected.
- Scroll down and click on the “Sign Out” button.
- Enter your Apple ID password when prompted and click on “Continue”.
- Follow the on-screen instructions to complete the sign-out process for iCloud and other accounts.
By signing out of your accounts, your personal information, such as contacts, photos, and documents, will be safely stored during the reset process.
Disable Filevault
FileVault is a security feature on your Macbook Air that encrypts your disk and protects your data. However, it’s important to disable FileVault before resetting your device. Follow these steps:
- Click on the Apple logo in the top-left corner of the screen and select “System Preferences”.
- In the System Preferences window, click on “Security & Privacy”.
- Choose the “FileVault” tab at the top.
- Click on the padlock icon on the bottom left and enter your administrator password.
- Click on the “Turn Off FileVault” button.
- Wait for the decryption process to complete.
Disabling FileVault will ensure that your drive is not encrypted during the reset, allowing for a smoother reset process.
Disable Find My Mac
Find My Mac is a useful feature that helps you locate your Macbook Air if it’s lost or stolen. However, it needs to be disabled before resetting your device. Here’s how you can do it:
- Open the “System Preferences” window again by clicking on the Apple logo.
- Click on “Apple ID” to access your iCloud settings.
- Select the “Overview” option on the left-hand side.
- Scroll down and uncheck the “Find My Mac” option.
- Enter your Apple ID password if prompted.
- Click on “Continue” to confirm the disablement of Find My Mac.
Disabling Find My Mac ensures that your Macbook Air can be reset without any complications.
Now that you have signed out of iCloud and other accounts, disabled FileVault, and disabled Find My Mac, your Macbook Air is ready for a successful reset. These preparatory steps will minimize the risk of data loss and ensure a smooth transition to factory settings.
Starting The Reset Process
Learn how to reset your MacBook Air to factory settings without using a disc. This step-by-step guide will help you start the reset process effortlessly and efficiently.
Restarting Your Macbook Air
To begin the process of resetting your MacBook Air to factory settings without a disc, you first need to restart your device. This step ensures a clean slate for the reset process. To restart your MacBook Air, follow these steps:
1. Make sure all your work is saved and any open applications are closed.
2. Click on the Apple menu located on the top left corner of your screen.
3. From the drop-down menu, select the “Restart” option.
4. Alternatively, you can press the Control + Eject key simultaneously to bring up the Restart dialog box.
5. In the dialog box, click on the “Restart” button.
Once you have successfully restarted your MacBook Air, the reset process can now proceed.
Launching Macos Recovery
After restarting your MacBook Air, you need to launch the macOS Recovery utility, which will guide you through the factory reset. To launch macOS Recovery, follow these steps:
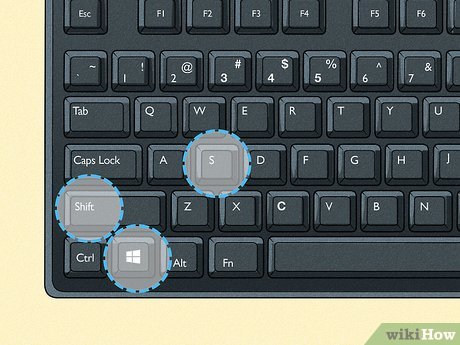
1. Press and hold the Command + R keys immediately after your Mac restarts.
2. Continue holding the keys until the Apple logo or a spinning globe emblem appears on the screen.
3. Release the keys when you see the macOS Utilities window.
At this point, you have successfully accessed the macOS Recovery utility, and you can proceed to erase the hard drive.
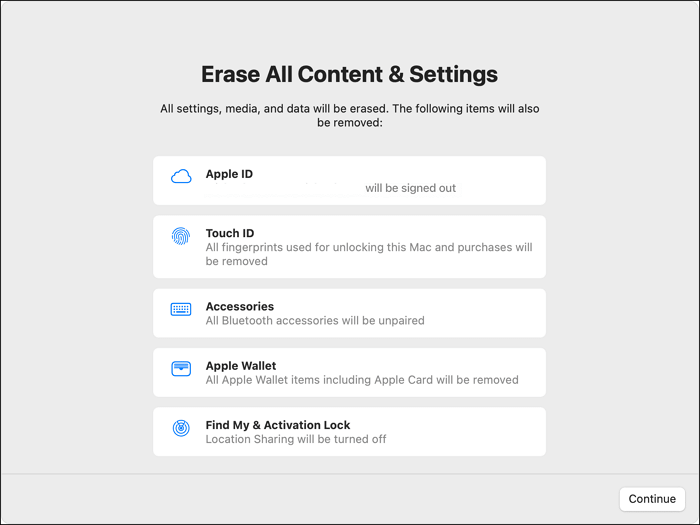
Erasing The Hard Drive
Before you can reset your MacBook Air to factory settings, you must erase the hard drive to remove all your personal data. Follow these steps to erase your hard drive:
1. In the macOS Utilities window, select the “Disk Utility” option and click “Continue.”
2. Locate your startup disk in the list of available drives on the left side of the Disk Utility window.
3. Select your startup disk and click on the “Erase” button at the top of the window.
4. Give your drive a name and choose the appropriate format (typically macOS Extended Journaled).
5. Click on the “Erase” button to begin the erasing process.
This process may take some time, depending on the size of your hard drive. Once the erasing is complete, you can proceed with the factory reset to restore your MacBook Air to its original settings.
By following these steps, you can easily reset your MacBook Air to factory settings without the need for a disc. It’s important to note that this process will erase all your data, so be sure to back up any important files before proceeding.
Credit: www.easeus.com
Reinstalling Macos
Learn how to easily reset your MacBook Air to factory settings without using a disc by reinstalling macOS. Follow this step-by-step guide to bring your device back to its original state.
Selecting Reinstall Macos Option
To reset your MacBook Air to factory settings without a disc, you can take advantage of the built-in macOS recovery mode. Reinstalling macOS is a straightforward process that can breathe new life into your device. Here’s how to do it:
- Start by powering off your MacBook Air.
- Now, press the power button to turn it on, and immediately hold down the Command and R keys together until you see the Apple logo appear.
- Release the keys once the macOS Utilities window pops up.
- From the options available, choose “Reinstall macOS” and click on Continue.
Choosing The Desired Installation Disk
After selecting the reinstall macOS option, it’s time to choose the installation disk:
- In the installation window, you’ll see a list of available disks. Select your desired installation disk where you want to reinstall macOS and click on Continue.
- If you don’t see any disks listed, you might need to erase your disk first. To do that, select “Disk Utility” from the macOS Utilities window, choose your disk, click on Erase, and follow the on-screen instructions. Once your disk is erased, go back to the macOS Utilities window and select “Reinstall macOS.”
- If prompted, enter your Apple ID and password to authorize the installation.
- Click on Continue to proceed with the installation.
Following On-screen Instructions
Once you’ve selected the desired installation disk, it’s time to follow the on-screen instructions to reset your MacBook Air to factory settings:
- Review the license agreement and click on Agree if you accept the terms and conditions.
- Choose the disk on which you want to install macOS and click on Install.
- The installation process will begin, and it may take some time to complete.
- Once the installation is finished, your MacBook Air will restart automatically.
That’s it! You’ve successfully reinstalled macOS on your MacBook Air. Now you can set up your device as if it were brand new. Remember to back up your important files before starting the process, as it will erase all data from your MacBook Air.
Restoring Your Data
When you reset your MacBook Air to factory settings, you will need to restore your data to ensure you don’t lose any important files or settings. There are several methods you can use to accomplish this task. Below, we will discuss three different ways to restore your data: restoring from Time Machine, downloading from iCloud, and transferring from external storage.
Restoring From Time Machine
If you have been regularly backing up your MacBook Air using Time Machine, restoring your data becomes a breeze. Here’s how you can do it:
1. Connect Your Time Machine Backup:
Start by connecting your Time Machine backup drive to your MacBook Air. Once connected, launch the Migration Assistant utility, which can be found in the Utilities folder within the Applications folder.
2. Select the Backup:
In Migration Assistant, select the option to restore from a Time Machine backup and click Continue. Choose the most recent backup you want to restore from and click Continue again.
3. Customize Your Restore:
You can now select the files and applications you want to restore or transfer to your MacBook Air. Once you have made your selections, click Continue to begin the restoration process.
Downloading From Icloud
Another convenient way to restore your data is by downloading it from iCloud. If you have been using iCloud to store your files, follow these steps:
1. Sign In to iCloud:
Open System Preferences and click on Apple ID. Sign in with your Apple ID and password to access your iCloud account.
2. Enable iCloud Services:
Ensure that the checkboxes next to services like iCloud Drive, Photos, Contacts, and Calendar are selected to restore these specific data types.
3. Download Your Data:
Open the respective apps for the data you want to restore, such as Photos or Pages. Enable iCloud syncing for these apps to download your data from iCloud and restore it to your MacBook Air.
Transferring From External Storage
If you have saved your data on an external storage device, such as a USB drive or an external hard drive, you can easily transfer it back to your MacBook Air by following these steps:
1. Connect the External Storage:
Plug in your external storage device to your MacBook Air using the appropriate cable or connector.
2. Open Finder:
Open a new Finder window and locate your external storage device in the sidebar under the Devices section.
3. Copy Files to MacBook Air:
Click and drag files and folders from the external storage device to the desired location on your MacBook Air, such as the Documents folder or the Desktop.
By following one of these three methods – restoring from Time Machine, downloading from iCloud, or transferring from external storage, you can easily restore your data and ensure a smooth transition back to your MacBook Air after resetting it to factory settings.
Final Steps
Final Steps:
After completing the initial steps of resetting your MacBook Air to factory settings without a disc, there are a few final steps you should take to ensure everything is set up correctly and your Mac is ready to use. These steps include setting up your MacBook Air, updating software and apps, and securing your device.
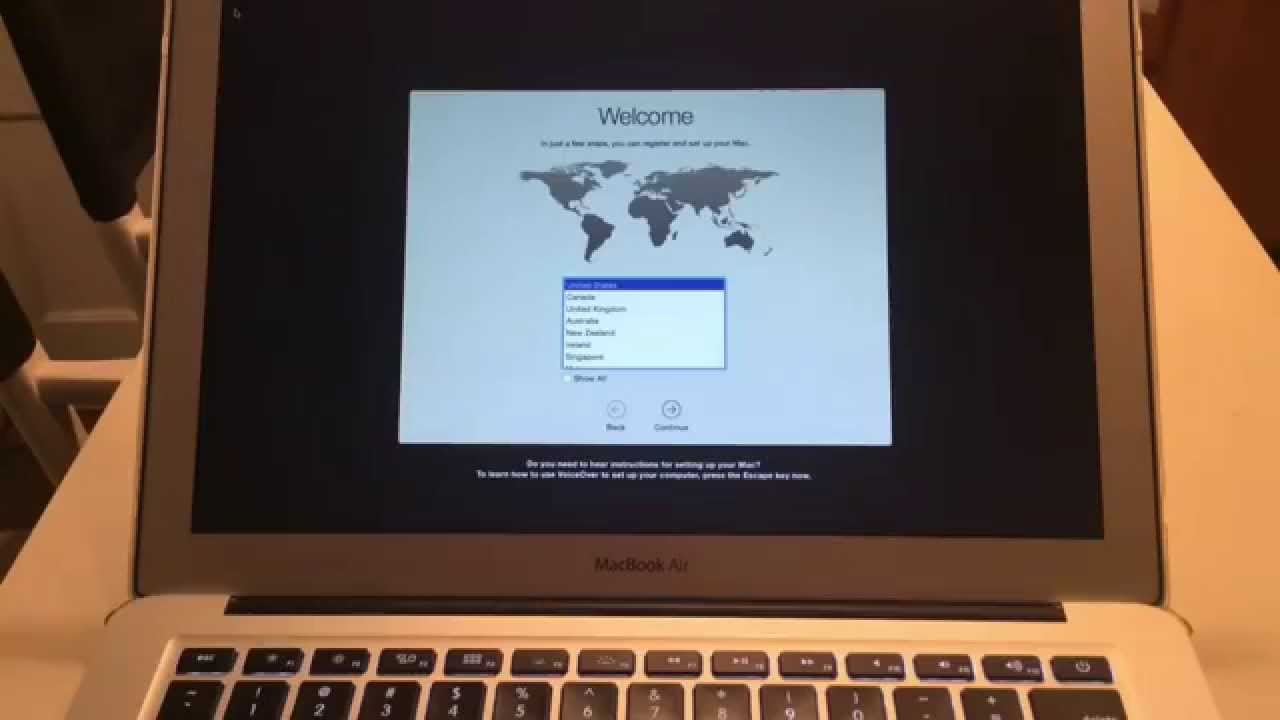
Setting Up Your Macbook Air:
Once you have completed the factory reset process, it’s time to set up your MacBook Air from scratch. The setup wizard will guide you through the process of selecting your preferred language, setting up your Wi-Fi network, and signing in with your Apple ID. Make sure to have your Apple ID credentials ready to expedite the setup process.
Updating Software And Apps:
After successfully setting up your MacBook Air, it’s essential to update both the macOS software and the apps installed on your device. This ensures that you have the latest features, bug fixes, and security patches. To update your macOS, simply click on the Apple logo in the top-left corner of your screen, select “System Preferences,” and then choose “Software Update.” Follow the on-screen instructions to download and install any available updates.
For updating your apps, open the App Store on your MacBook Air and click on the “Updates” tab. Here, you’ll find a list of apps that have available updates. Click on the “Update” button next to each app to download and install the latest versions.
Securing Your Macbook Air:
Securing your MacBook Air should be a top priority once you’ve completed the factory reset. Here are a few security measures you should consider:
- Set up a strong password: Creating a strong and unique password helps protect your device from unauthorized access. Make sure to use a combination of letters, numbers, and special characters.
- Enable FileVault: FileVault encrypts the data on your MacBook Air, providing an extra layer of security. You can enable FileVault by going to “System Preferences,” selecting “Security & Privacy,” and clicking on the “FileVault” tab.
- Install an antivirus software: While macOS is generally secure, installing an antivirus software adds an additional layer of protection against malware and other malicious threats.
- Enable Firewall: The built-in Firewall feature on your MacBook Air helps block unauthorized incoming network connections. You can activate it by going to “System Preferences,” selecting “Security & Privacy,” and clicking on the “Firewall” tab.
By taking these security measures, you can better safeguard your MacBook Air and protect your personal information from potential threats.
Credit: m.youtube.com
Frequently Asked Questions Of How To Reset Macbook Air To Factory Settings Without Disc
How Do I Reset My Macbook Air To Factory Settings Without A Disc?
To reset your MacBook Air without a disc, go to the Apple menu, select “Restart,” hold down Command + R until you see the Apple logo, choose “Disk Utility,” and then select “Erase” to restore your MacBook to its factory settings.
Can I Reset My Macbook Air To Factory Settings Without Losing Data?
Yes, you can reset your MacBook Air to factory settings without losing data by backing up your important files and then selecting the “Reinstall macOS” option from the Disk Utility menu during the reset process.
Will Resetting My Macbook Air Improve Its Performance?
Resetting your MacBook Air to factory settings can help improve its performance by removing unnecessary files, apps, and settings that may be slowing it down. However, it’s also important to regularly maintain and update your MacBook for optimal performance.
What Should I Do Before Resetting My Macbook Air To Factory Settings?
Before resetting your MacBook Air to factory settings, it’s recommended to back up your important files, sign out of iCloud and iTunes, deauthorize any Apple services or apps, and ensure you have the necessary software licenses or activation codes for reinstalling any third-party software.

Conclusion
Resetting your MacBook Air to factory settings without a disc is a simple and efficient process that can help resolve various issues and improve the overall performance of your device. By following the step-by-step guide outlined in this blog post, you can easily reset your MacBook Air without the need for additional software or a physical disc.
Remember to back up your data and make sure you have a stable internet connection before proceeding. Enjoy your clean and refreshed Mac!