To screenshot on Thinkpad Laptop, press the “Print Screen” key on your keyboard. Then, open the desired application or program and use Ctrl + V to paste the screenshot.
With a simple keyboard shortcut, you can easily capture and save what’s on your screen. When it comes to capturing and sharing important information on your Thinkpad Laptop, taking a screenshot can be incredibly useful. Whether you want to save an image or document, or share a specific detail with someone, knowing how to take a screenshot quickly can save you time and effort.
We will guide you through the simple steps to take a screenshot on a Thinkpad Laptop. By following these instructions, you’ll be able to capture anything that’s on your screen with ease.
Setting Up Screenshot Tools
Installing Snipping Tool
If you want a quick and effective way to take screenshots on your Thinkpad Laptop, the Snipping Tool is a great built-in option. To install it, follow these simple steps:
- Click on the Start button
- In the search bar, type “Snipping Tool”
- Click on the Snipping Tool app to open it
- Pin it to your taskbar for easy access
Customizing Screenshot Settings
To make the most of your screenshot experience, you can customize the settings to your preferences:
- Select the mode that suits your needs – Free-form, Rectangular, Window, or Full-screen
- Set the default format and quality for your screenshots
- Choose where the screenshots are saved for easy access

Credit: www.wikihow.com
Using Built-in Shortcuts
When it comes to taking a screenshot on your Thinkpad laptop, using built-in shortcuts can be a quick and efficient way to capture what’s on your screen. These simple shortcuts can save you time and ensure you capture the exact content you need without the hassle of third-party applications.
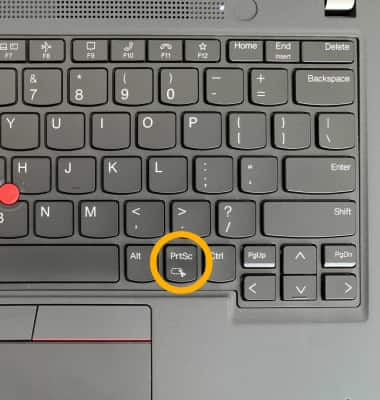
Using Prtscn Key
The PrtScn (Print Screen) key on your Thinkpad laptop can be a convenient way to capture your entire screen. Simply press the PrtScn key to take a screenshot of the full screen, and the image will be copied to your clipboard. You can then paste the screenshot into an image editing program or a document to save or edit it as needed.
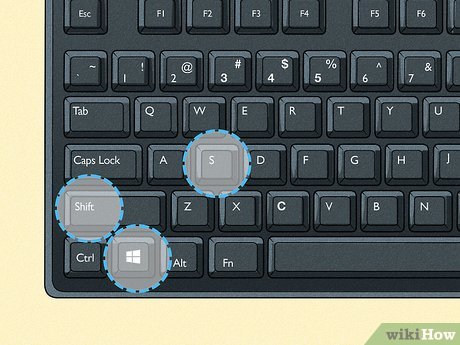
Using Windows Key + Shift + S
If you want more control over what you capture, you can use the Windows Key + Shift + S shortcut. This allows you to select a specific area of your screen to capture. After pressing the shortcut, a crosshair cursor will appear, and you can click and drag to select the desired area. The captured image will be saved to your clipboard, ready for pasting and editing.
Third-party Software Options
When it comes to taking screenshots on a ThinkPad laptop, using third-party software can offer more advanced features and customization options. Below, we’ll explore the Overview of Third-Party Tools and provide some Recommendations for Screenshot Software that you can consider for your ThinkPad device.
Overview Of Third-party Tools
- Third-party screenshot tools provide additional functionality beyond the built-in options on ThinkPad laptops
- These tools often offer features like scrolling capture, annotation tools, and easy sharing options
- Users can customize settings and shortcuts for taking screenshots according to their preferences
Recommendations For Screenshot Software
- Snagit: A popular choice known for its robust editing features and easy sharing capabilities
- Lightshot: Offers a simple interface with basic editing tools for quick and efficient screenshot capture
- Greenshot: Known for its open-source nature and customizable options for capturing screenshots
Editing And Saving Screenshots
Screenshots are a valuable tool for capturing important information on your Thinkpad laptop. Once you have taken a screenshot, you may want to edit it to highlight specific details or save it in a different format for easier sharing with others. In this section, we will explore how to open screenshots for editing and save them in different formats.
Opening Screenshots For Editing
To open a screenshot for editing on your Thinkpad laptop, you can follow these simple steps:
- Locate the saved screenshot file on your computer.
- Right-click on the screenshot file and select an editing option from the menu.
- If you have an image editing software installed, choose “Open with [software name]” to open the screenshot in the selected program.
- Once the screenshot is open for editing, you can crop, resize, annotate, or apply other modifications to enhance the image.
Saving Screenshots In Different Formats
Thinkpad laptops offer the flexibility to save your screenshots in various formats, depending on your specific requirements. Here are the steps to save your screenshots in different formats:
- After completing any necessary edits, go to the “File” menu of your image editing software.
- Select the “Save As” or “Export” option.
- Choose the desired format from the available options, such as JPEG, PNG, or GIF.
- Specify the file name and location for saving the screenshot.
- Click on the “Save” button to save the screenshot in the selected format.
By saving your screenshots in different formats, you can easily adapt them to various platforms and devices, making it simpler to share and utilize the captured information.
Troubleshooting Common Issues
Having trouble taking screenshots on your Thinkpad Laptop? Troubleshoot common issues by checking keyboard shortcuts or updating display drivers. Properly setting the screen resolution can also help resolve any screenshotting problems you may encounter.
Dealing With Error Messages
If you encounter error messages while trying to take a screenshot on your ThinkPad laptop, don’t worry – there are solutions. Here are a few common error messages and how to troubleshoot them:
Addressing Incompatibility Problems
If you are facing compatibility issues when attempting to capture a screenshot on your ThinkPad laptop, follow these steps to resolve them:
Credit: www.att.com
Advanced Tips And Tricks
Advanced Tips and Tricks:
Using Snip & Sketch For Annotations
- Create visual tutorials with annotations
- Highlight important areas with a colored pen
- Include text notes to explain details
Taking Screenshot Of Only Active Window
- Press Alt + Print Screen buttons
- Open a document or image editing software
- Press Ctrl + V to paste the screenshot of the active window

Credit: www.awesomescreenshot.com
Frequently Asked Questions For How To Screenshot On Thinkpad Laptop
How Do You Screenshot On A Thinkpad?
To screenshot on a Thinkpad, press the “Print Screen” button located at the top right of the keyboard. The screenshot will be saved to the clipboard, and you can paste it into a document or image editing program.
How Do You Screenshot On A Dell Thinkpad?
To take a screenshot on a Dell Thinkpad, press the “Fn” key and the “Print Screen” key together. The screenshot will be saved to your clipboard, ready to be pasted into an image editing program or document.
How Do You Screenshot On A Thinkpad Without A Windows Key?
To screenshot on a Thinkpad without a Windows key, use the “PrtScn” key and paste into an image editor.
How To Do A Screenshot On A Laptop?
To take a screenshot on a laptop, press the “PrtScn” or “Print Screen” button. Then paste the screenshot into an application such as Paint and save it.
How Do I Take A Screenshot On My Thinkpad Laptop?
To take a screenshot on your Thinkpad Laptop, press the “Print Screen” button on your keyboard. The screenshot will be saved to your clipboard and you can paste it into an image editing program.
Conclusion
To sum up, capturing screenshots on a ThinkPad laptop is simple yet essential. Whether for work or personal use, knowing this function enhances your productivity. By following the steps outlined in this guide, you can effortlessly take screenshots on your ThinkPad laptop like a pro.
Happy capturing!