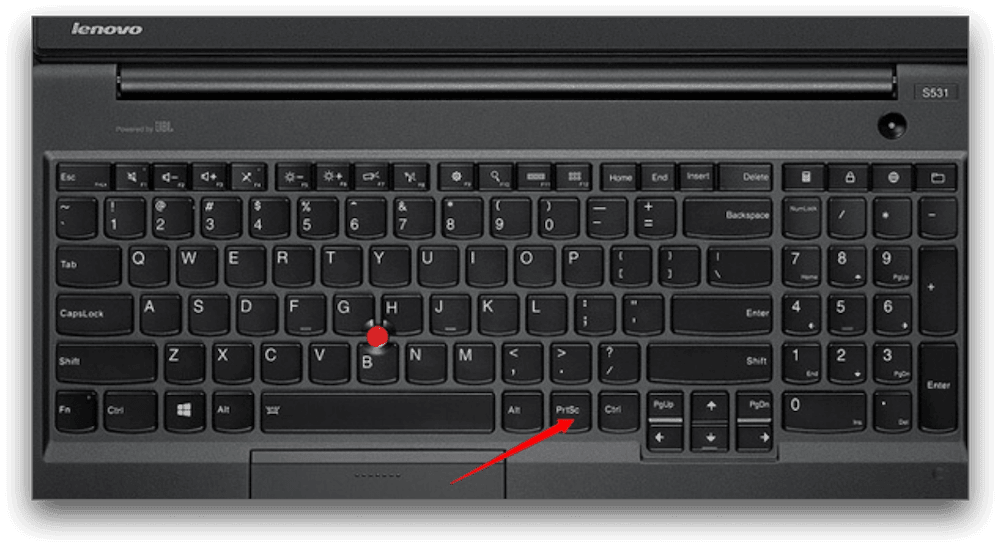
To take a screenshot on a Lenovo laptop, simply press the “PrtSc” or “Print Screen” key located on the top row of the keyboard. Now, let’s dive into the details of how to capture screenshots on a Lenovo laptop.
Lenovo laptops are known for their reliability and versatility. Whether you want to capture an important moment, save a piece of information, or share something interesting with others, knowing how to take screenshots can be incredibly handy. We will walk you through the different methods you can use to screenshot on a Lenovo laptop.
From using the traditional “Print Screen” key to utilizing advanced screenshot tools, we’ve got you covered. So, let’s get started and learn how to capture screenshots effortlessly on your Lenovo laptop.
Credit: markuphero.com
Methods Of Screenshot On Lenovo Laptop
To capture a screenshot on a Lenovo laptop, use the keyboard shortcut FN + PrtScn or Alt + PrtScn to take a full or selective screenshot. Afterward, access the saved screenshots in the Pictures folder for easy viewing and sharing.
Lenovo laptops come with a variety of built-in tools that make taking screenshots a breeze. One such tool is the Snipping Tool, which allows you to capture a portion of the screen and save it as an image. To access the Snipping Tool, simply click on the Start button, type “Snipping Tool” in the search bar, and then select it from the results. Another built-in tool that can be used for taking screenshots is the ‘Windows + Print Screen’ feature, which captures the entire screen and automatically saves it as an image in the Pictures library. These built-in tools provide convenient options for capturing screenshots on your Lenovo laptop.
An efficient method for taking screenshots on a Lenovo laptop is by utilizing keyboard shortcuts. For example, pressing the ‘PrtScn’ key allows you to capture the entire screen, while ‘Alt + PrtScn’ captures the active window. You can then paste the screenshot into an image editing program such as Paint and save it. Additionally, pressing ‘Windows + Shift + S’ opens the snipping bar, providing the flexibility to capture a selected area of the screen. These keyboard shortcuts offer quick and easy ways to capture and save screenshots on your Lenovo laptop.
Using Built-in Tools
When it comes to taking screenshots on your Lenovo laptop, utilizing the built-in tools can make the process seamless and efficient. Whether you need to capture a full screen, a specific window, or a customized area, Lenovo laptops offer handy features to fulfill your screenshot needs.
Snipping Tool
The Snipping Tool can be a valuable asset when it comes to capturing screenshots on your Lenovo laptop. This built-in tool allows you to select a portion of the screen and save the snip as an image. Quick and easy to use, the Snipping Tool provides flexibility in capturing specific details, perfect for sharing or saving important information.
Snip & Sketch App
With the Snip & Sketch App, Lenovo provides a feature-rich solution for capturing and annotating screenshots. This built-in app allows you to take a screenshot of the entire screen or specify a specific area. Additionally, you can use the built-in annotation tools to mark up the captured images, enhancing communication and collaboration.
Using Keyboard Shortcuts
Capturing Full Screen
Press Fn + PrtScn keys simultaneously to capture the entire screen.
Capturing Selected Area
Press Fn + Shift + S to select and capture a specific area on your Lenovo laptop.

Credit: www.wikihow.com
Saving And Editing Screenshots
Learn how to efficiently take and modify screenshots on your Lenovo laptop for quick sharing and editing. Master the art of capturing and enhancing screen images hassle-free.
Choosing File Format
When it comes to saving screenshots on your Lenovo laptop, one important aspect to consider is the file format. Different file formats serve different purposes and have varying levels of compatibility with different software and devices.
One of the most common and widely supported file formats for screenshots is PNG (Portable Network Graphics). PNG files offer a high-quality and lossless compression, meaning your screenshots will retain their sharpness and clarity. They are also suitable for uploading to websites and sharing on social media platforms.
An alternative file format you can choose is JPEG (Joint Photographic Experts Group). JPEG files are smaller in size, making them more suitable for situations where you need to save storage space. However, keep in mind that JPEG files use a lossy compression algorithm, which means there might be a slight reduction in image quality.
If you intend to further edit your screenshots or want to keep the layers intact, you can opt for BMP (Bitmap) format. BMP files are larger in size and don’t offer compression, but they provide the highest level of detail and can be easily edited in various image editing software.
Editing Options
Once you have captured a screenshot on your Lenovo laptop, you might want to make some adjustments or add annotations before sharing or using the image. Fortunately, there are several editing options available that can help you enhance and customize your screenshots.
Windows Snipping Tool is a built-in tool in Windows operating systems that allows you to capture and edit screenshots. It provides basic editing features like cropping, highlighting, and adding text.
For more advanced editing capabilities, you can consider using third-party software like Adobe Photoshop or GIMP (GNU Image Manipulation Program). These software offer a wide range of editing features, including adjusting colors, sharpening images, removing backgrounds, and adding layers and effects.
If you prefer a simpler and more user-friendly option, there are various online screenshot editors available. These online tools allow you to upload your screenshot and make quick edits, such as resizing, cropping, and adding text or shapes.
Alternative Methods
While the built-in methods for taking screenshots on a Lenovo laptop are incredibly convenient, there are alternative methods available if you’re looking for more flexibility or options. Third-party apps and browser extensions provide additional features and customization, making it easier to capture and edit screenshots according to your specific needs. In this article, we’ll explore these alternative methods in detail, so you can choose the best approach for your Lenovo laptop.
Third-party Apps
If you want more advanced screenshot-taking capabilities, third-party apps can be a great solution. These apps offer a wide range of features, including the ability to capture specific areas, annotate screenshots, record screencasts, and even share screenshots directly to social media platforms. One popular choice is Snagit, which is known for its user-friendly interface and powerful functionality.
Pros:
- Access to advanced features like annotation and screen recording.
- Ability to capture specific areas or windows with ease.
- Intuitive user interface for effortless navigation.
- Integration with popular social media platforms for easy sharing.
Cons:
- May require installation and take up space on your laptop.
- Some apps may have a learning curve for new users.
- Cost associated with certain premium third-party apps.
Browser Extensions
Another alternative method for taking screenshots on your Lenovo laptop is by using browser extensions. These extensions can be added to your preferred web browser, providing quick and easy access to screenshot functionalities while browsing the internet. One popular extension is Lightshot, which allows you to capture specific areas and provides options for editing and sharing the screenshots.
Pros:
- Convenient access to screenshot functions directly from your browser.
- Options for editing and annotating screenshots.
- Ability to save screenshots locally or upload them to the cloud.
Cons:
- Limited functionality compared to dedicated third-party apps.
- May only work within the browser and not on other applications.
- Possibility of compatibility issues with certain browser versions.
By utilizing either third-party apps or browser extensions, you can enhance your screenshot-taking experience on your Lenovo laptop. Whether you need advanced editing features or a seamless integration with your browsing activities, these alternative methods provide the flexibility you may be looking for. Experiment with different options and find the one that suits your needs best!

Credit: www.awesomescreenshot.com
Frequently Asked Questions On How To Screenshot On Lenovo Laptop
How Do I Take A Screenshot On My Lenovo Laptop?
To take a screenshot on your Lenovo laptop, press the Windows key + PrtScn button. The screen will dim for a moment, indicating that the screenshot has been taken. You can find the screenshot in your Pictures folder in a folder called Screenshots.
How To Screenshot On Lenovo Computer Without Print Screen Button?
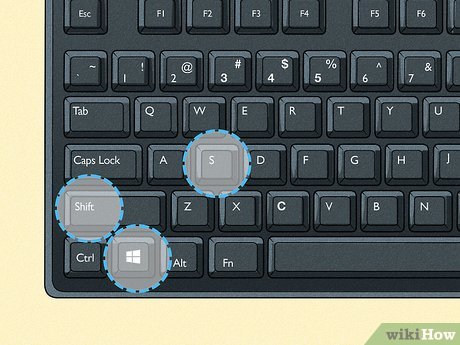
To take a screenshot on a Lenovo computer without the Print Screen button, simply use the Windows key and the Shift key together, then press S. This allows you to select the area you want to capture. The screenshot will be saved to your clipboard for easy pasting.
How Do I Take Screenshots On My Laptop?
To take screenshots on your laptop, press the “Print Screen” key. Find the screenshot in the “Pictures” folder.
How Do You Screenshot On A Lenovo Chromebook Laptop?
To take a screenshot on a Lenovo Chromebook laptop, press the Ctrl and Window Switcher keys simultaneously.
How Do I Take A Screenshot On My Lenovo Laptop?
You can take a screenshot on your Lenovo laptop by pressing the “PrtScn” or “Print Screen” key on your keyboard.
Conclusion
Capturing screenshots on your Lenovo laptop is an essential skill. Follow these simple steps and master the art today. With proper guidance, anyone can take screenshots effortlessly. Enhance your productivity and share important information seamlessly. Don’t miss out on this useful feature!