To take a screenshot on a Dell laptop, press the “Print Screen” key on your keyboard. Capturing screenshots on a Dell laptop is a simple process that can be useful for various purposes.
Whether you need to save an image from a website, capture an error message, or create a visual guide, taking a screenshot can come in handy. We will explore different ways to screenshot on a Dell laptop, including built-in methods and third-party software options.
By the end, you will be equipped with the knowledge to easily capture and save screenshots on your Dell laptop.

Credit: markuphero.com
Methods For Screenshot On Dell Laptop
Screenshots can be a vital tool for capturing important information or moments on your Dell laptop. Whether you need to save a webpage for future reference, highlight an error message, or simply want to capture a beautiful moment on your screen, knowing how to take a screenshot is essential. There are a few different methods you can use to take a screenshot on your Dell laptop, whether you prefer using built-in tools or third-party software.
Using Built-in Tools
If you prefer using the built-in tools on your Dell laptop, taking a screenshot is quick and easy. Here are the steps for taking a screenshot using the built-in tools:
- Press the “Print Screen” key on your keyboard to capture the entire screen.
- To capture just the active window, press “Alt + Print Screen” keys simultaneously.
- Once the screenshot is captured, open a program like Paint or Word, and press “Ctrl + V” to paste the screenshot.
Using Third-party Software
If you prefer more advanced features or want to streamline the screenshot process, you can opt for third-party software. There are numerous third-party tools available that provide additional features like editing, annotation, and instant sharing. Some popular options for screenshot software include:
- Snagit: Offers advanced editing features and organizational tools.
- Lightshot: Allows quick editing and instant sharing options.
- Greenshot: Provides customizable screenshot options and annotation tools.
By choosing the method that best suits your needs, you can easily capture and utilize screenshots on your Dell laptop for personal or professional use.
Shortcut Keys For Screenshots
When it comes to quickly capturing what’s on your Dell laptop screen, using shortcut keys for screenshots is the way to go. These key combinations allow you to capture the entire screen or a specific area without the need for third-party software or applications. Let’s explore the various shortcut keys you can use to take a screenshot on your Dell laptop.
Capturing Full Screen
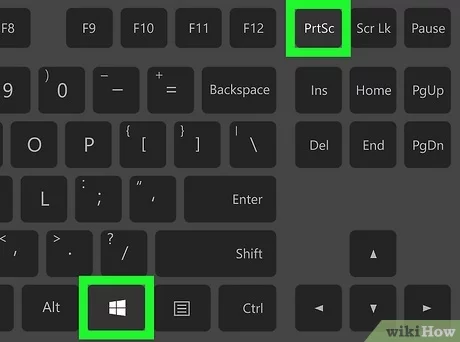
When you want to capture the entire screen of your Dell laptop, press the Print Screen (PrtScn) key. This will capture a snapshot of the entire display and copy it to the clipboard, allowing you to paste it into an image editor or document.
Selecting Specific Area
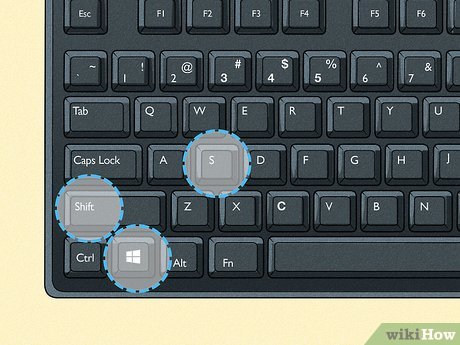
If you only want to capture a specific area of the screen, you can use the Windows key + Shift + S shortcut. This will dim the screen and allow you to select the desired area using your cursor. The screenshot will then be saved to the clipboard for easy pasting.
Capturing Active Window
To capture the active window on your Dell laptop, simply press Alt + Print Screen (PrtScn). This will capture the currently active window and copy it to the clipboard for pasting into another application or document.
Customizing Screenshot Settings
Capturing screenshots on your Dell laptop is a handy tool for saving important information or sharing content with others. Customizing your screenshot settings allows you to tailor the format and quality of your screenshots to suit your needs and preferences.
Choosing File Format
When capturing screenshots on your Dell laptop, choosing the file format is essential for compatibility and usability. You can typically select from popular file formats such as PNG, JPEG, or GIF to ensure the image is suitable for your intended use.
Selecting Screenshot Quality
Selecting the screenshot quality is crucial to ensure the clarity and detail of the captured image. Adjusting the quality settings allows you to control the resolution and sharpness of the screenshot, providing you with the best possible image for your requirements.
Credit: www.zdnet.com
Saving And Accessing Screenshots
Are you a Dell laptop user looking to save and access screenshots on your device? You’ve come to the right place. In this blog post, we will guide you through the process of taking screenshots on a Dell laptop, and show you quick ways to save and access them whenever you need. Let’s get started!
Organizing Screenshot Files
When it comes to managing your screenshots, it’s important to keep them organized and easy to find. Here are a few tips to help you stay organized:
- Create a dedicated folder for your screenshots: It’s a good idea to create a separate folder on your laptop specifically for saving your screenshots. This way, you can keep all your screenshots in one place and access them quickly when needed.
- Use descriptive file names: When saving your screenshots, give them descriptive file names that reflect the content of the screenshot. This will make it easier for you to search and find specific screenshots later on.
- Sort screenshots by date: If you take a lot of screenshots regularly, consider sorting them by date. This way, you can easily locate the most recent screenshots or find screenshots taken on a specific day.
Quick Ways To Access Saved Screenshots
Once you have saved your screenshots, you’ll want to be able to access them quickly and easily. Here are a few methods to access your saved screenshots on a Dell laptop:
- Using the file explorer: Open the file explorer on your Dell laptop and navigate to the folder where you saved your screenshots. From there, you can browse through the screenshots and open them with a double-click.
- Using the “Recent Files” feature: On some Dell laptop models, you may find a “Recent Files” section in your file explorer. This section displays the most recent files you have accessed, including screenshots. Simply click on the screenshot you want to open, and it will open in the default image viewer.
- Using the search function: If you have trouble locating a specific screenshot, you can use the search function in the file explorer. Simply enter keywords related to the screenshot’s file name or content, and the search results will display all matching files, including screenshots.
By following these tips and utilizing these quick access methods, you can efficiently save and access your screenshots on your Dell laptop. With your screenshots organized and easily accessible, you’ll have the information you need right at your fingertips.
Additional Tips And Tricks
When it comes to taking screenshots on your Dell laptop, additional tips and tricks can help you make the most of this feature. Whether you need to annotate screenshots or efficiently share them with others, these strategies can enhance your overall experience. Read on to discover some valuable hints for optimizing your screenshot usage.
Annotating Screenshots
If you want to add notes or highlight specific areas in your screenshots, Dell laptops offer a feature-rich solution. By using the built-in Snip & Sketch app, you can easily annotate your screenshots with text, shapes, and freehand drawings. Simply open the app, capture the screenshot, and use the available tools to enhance your image as needed. This can be especially useful when providing visual instructions or feedback to others.
Sharing Screenshots Effectively
When it comes to sharing your screenshots, you have various options at your disposal. One convenient method is to use the Windows Snipping Tool or Snip & Sketch app to capture the image, then save it to your desired location. From there, you can attach it to an email, upload it to a cloud storage service, or share it directly with others via messaging apps. Additionally, many Dell laptops feature integrated social sharing options, allowing you to quickly post your screenshots on various platforms.
Credit: www.businessinsider.com
Frequently Asked Questions For How To Screenshot On Dell Laptop
How Do I Take A Screenshot On A Dell Laptop?
To take a screenshot on a Dell laptop, press the “PrtScn” key to capture the entire screen. For a specific window, use “Alt + PrtScn. ” The screenshot is saved to the clipboard and can be pasted into an image editor or document.
How To Screenshot On A Laptop?
To screenshot on a laptop, press “PrtScn” key to capture the entire screen, or “Alt + PrtScn” for the active window. Paste the screenshot in an image editor or document to save it.
How Do You Screenshot On A Dell Laptop Without Prtscn?
To take a screenshot on a Dell laptop without using PrtScn, you can try using the “Windows key + Shift + S” shortcut. This opens the Snip & Sketch tool, allowing you to select and capture the desired area on your screen.
What Is The Key For Screenshot In Laptop?
To take a screenshot on a laptop, press the “Print Screen” key (sometimes labeled as “PrtScn” or “PrtSc”) located on the top row of the keyboard. This captures an image of the screen, which you can paste into an image editing program or document using “Ctrl + V” or right-click and select “Paste.
“
Conclusion
Taking screenshots on your Dell laptop is a breeze. With these simple steps, capturing images becomes effortless. Enhance your productivity and communication by mastering this essential skill. Whether for work or personal use, knowing how to screenshot on a Dell laptop is a valuable tool.
Start capturing your screen with confidence today.