To screenshot on an HP laptop, press the “PrtSc” or “Print Screen” button on your keyboard. Capturing screenshots on an HP laptop is a simple process that allows you to save a copy of your screen as an image file.
Whether you want to capture an entire webpage, an error message, or just a specific part of your screen, knowing how to take a screenshot can be useful in various situations. In this guide, we will discuss the steps to capture screenshots on an HP laptop, providing you with an easy and efficient way to save and share what’s on your screen.
Whether you’re using Windows 10 or an earlier version of the operating system, the process is straightforward and doesn’t require any additional software.
Using Built-in Tools
When it comes to taking screenshots on your HP laptop, utilizing the built-in tools is the simplest and most convenient method. HP laptops are equipped with a range of native features that allow you to capture your screen effortlessly. Let’s explore how to take screenshots using these built-in tools.
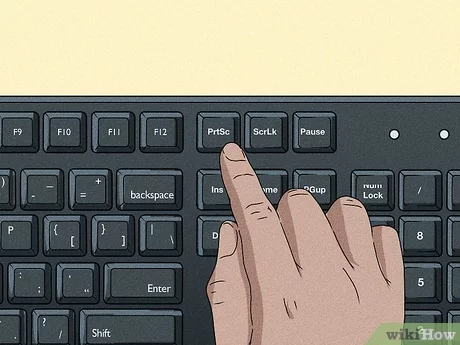
Utilizing The ‘prtscn’ Key
To capture your entire screen using the ‘PrtScn’ key, simply press “PrtScn” on your keyboard. This will instantly capture the entire screen and save it to your clipboard. You can then paste the screenshot into an image editor or a document by pressing “Ctrl + V”.
Using The ‘snipping Tool’
If you prefer to capture specific areas of your screen, HP laptops also come with the ‘Snipping Tool’ built-in. Simply search for “Snipping Tool” in the Windows search bar and open the application. From there, you can select the type of snip you want to take – free-form, rectangular, window, or full-screen. After capturing the desired area, you can save the snip as an image file.

Credit: www.wikihow.com
Snipping Tool Techniques
Learn about the efficient Snipping Tool Techniques on your HP laptop to quickly capture screenshots with ease.
Capturing A Specific Area
Easily capture only the desired section of your screen using the Snipping Tool feature on your HP laptop.
Taking A Full-screen Screenshot
Capture the entire contents displayed on your screen with a simple click using the Snipping Tool on your HP laptop.
Using Shortcuts
If you’re wondering how to take a screenshot on an HP laptop, using shortcuts is a quick and convenient method. With just a few key combinations, you can capture and save images of your screen effortlessly. In this section, we’ll explore two commonly used shortcuts: Windows key + PrtScn and Alt + PrtScn.
Windows Key + Prtscn Shortcut
The Windows key combined with the PrtScn (Print Screen) button is a straightforward way to take screenshots on an HP laptop. By pressing these keys simultaneously, the screen will dim momentarily, indicating that a screenshot has been captured and saved as an image file in the Pictures folder. You can access this folder by going to File Explorer and locating the Pictures folder.
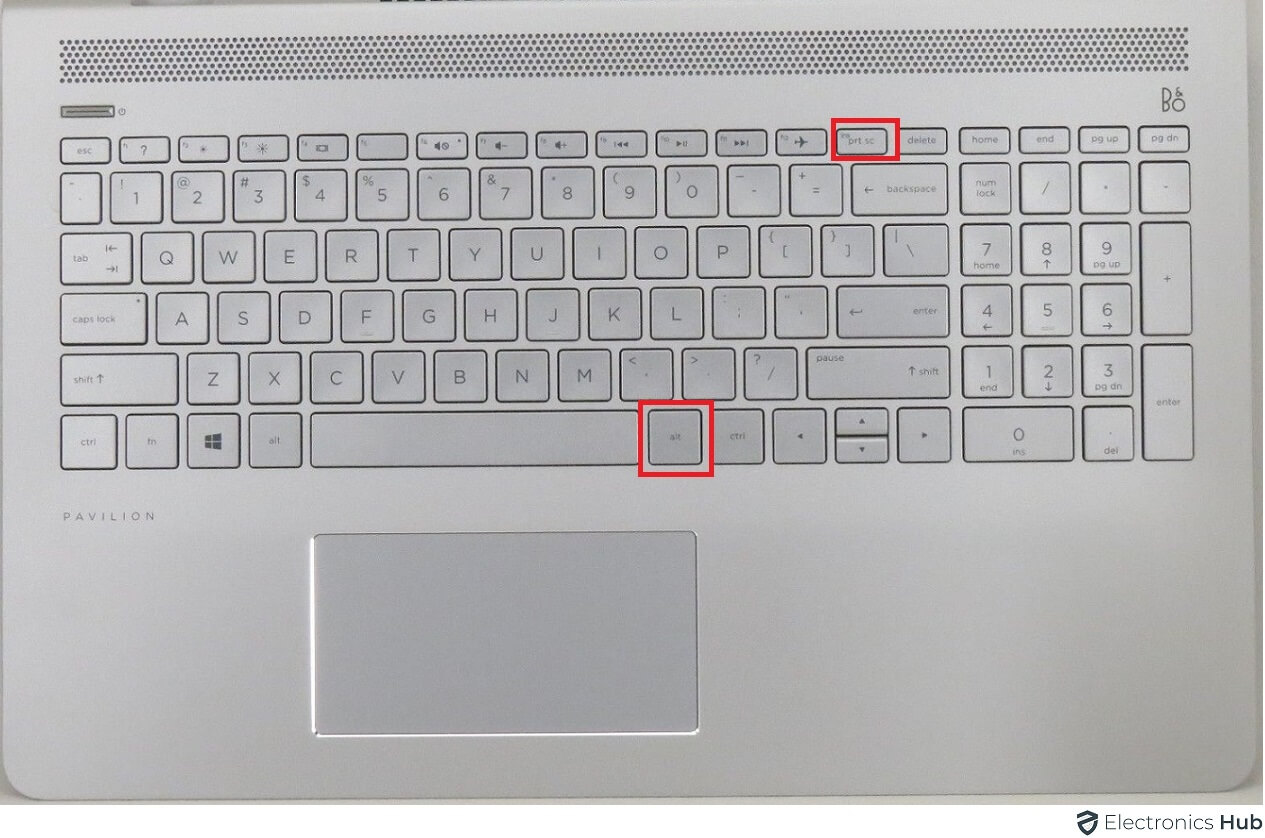
Alt + Prtscn Combination
If you’re looking to capture only the active window on your HP laptop, the Alt + PrtScn combination is the way to go. Simply press and hold the Alt key and then press PrtScn. Similar to the previous shortcut, a screenshot will be saved in the Pictures folder, but this time, it will only contain the active window.
It’s worth noting that these shortcuts work on most HP laptop models and are compatible with different versions of Windows OS, including Windows 10, Windows 8, and Windows 7. Additionally, you can also use third-party screenshot software or the built-in Snipping Tool for more advanced capturing options.
Now that you know how to take screenshots on your HP laptop using shortcuts, you can quickly capture important information, funny moments, or any images that catch your eye without any hassle.
Snip & Sketch App
Capture screenshots effortlessly on your HP laptop with Snip & Sketch app. This user-friendly tool allows you to easily select, annotate, and save screenshots, making it a must-have for all your visual documentation needs. Get it now for hassle-free screenshotting!
The ‘Snip & Sketch’ app is a versatile and convenient tool that comes pre-installed on HP laptops. It allows users to capture screenshots swiftly and effortlessly, making it a go-to solution for those who frequently need to save and share information on their laptops. With its intuitive interface and range of features, the Snip & Sketch app takes the process of capturing screenshots to a whole new level. Let’s delve into this incredible app and learn how to effectively utilize it for capturing screenshots on your HP laptop.
Introduction To The Snip & Sketch App
The Snip & Sketch app is a successor to the familiar Snipping Tool that was previously present on Windows operating systems. However, this new app brings enhanced functionality and a refreshed user interface, making it even more desirable for users. Its main purpose is to capture screenshots, but it also offers a range of editing tools to annotate and modify the captured images. Whether you need to capture a specific region, window, or full screen, the Snip & Sketch app has got you covered.
Step-by-step Guide For Taking A Screenshot
Here’s a step-by-step guide on how to efficiently take a screenshot using the Snip & Sketch app on your HP laptop:
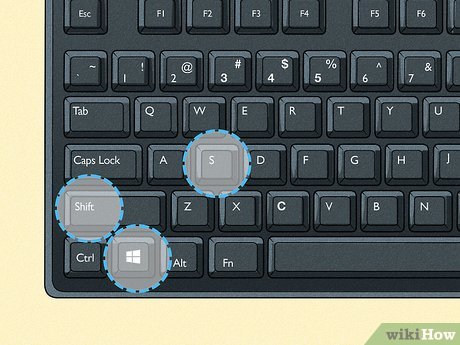
- Begin by launching the Snip & Sketch app. You can do this by searching for it in the Start menu or by using the Windows key + Shift + S keyboard shortcut.
- Once the app is open, you will notice a small toolbar on top of your screen with options for capturing screenshots.
- To capture a full-screen screenshot, simply click on the “New” button with the icon of a computer monitor.
- If you want to capture a specific region, click on the “New” button with the icon of a rectangular shape. This allows you to drag and select the desired area.
- For capturing a specific window, click on the “New” button with the icon of a window. After clicking this button, you can hover over the window you want to capture, and it will be highlighted for you to select.
- After capturing the screenshot, you can use the editing tools provided by the Snip & Sketch app to annotate, crop, or highlight specific parts of the image.
- Once you are satisfied with your edits, click on the “Save” button in the top-right corner of the app to save the screenshot to your desired location on your HP laptop.
Taking screenshots on your HP laptop has never been easier, thanks to the Snip & Sketch app. Whether you need to capture important information, save visual inspirations, or simply share something interesting, this app is a valuable tool at your disposal. So, the next time you find yourself in need of a screenshot, remember to utilize the Snip & Sketch app for a seamless and efficient experience.
Save And Edit The Screenshot
Finding The Screenshot File
To locate the captured screen image on your HP laptop:
- Go to the “Pictures” folder on your PC.
- Look for a subfolder named “Screenshots.”
- Double-click to access and view your screenshots.
Basic Editing Using Paint Or Other Tools
Follow these steps for simple editing using Paint:
- Open the desired screenshot in Paint.
- Use the tools to add text, shapes, or crop the image.
- Save the edited file back to your PC.

Credit: www.hp.com
Using Third-party Software
When it comes to taking screenshots on an HP laptop, using third-party software can provide additional features and flexibility. By utilizing third-party tools, you can customize your screenshots and enhance your overall experience.
Recommended Third-party Screenshot Tools
- Snagit: Offers advanced editing features and the ability to capture scrolling windows.
- Lightshot: Simple and user-friendly tool with basic editing functions.
- Greenshot: Provides various screenshot modes and annotation tools.
- ShareX: Ideal for capturing and sharing screenshots quickly with customizable workflows.
Comparison Of Various Third-party Options
| Tool | Features |
|---|---|
| Snagit | Advanced editing, scrolling capture |
| Lightshot | Basic editing tools, simplicity |
| Greenshot | Different capture modes, annotation options |
| ShareX | Quick sharing, customizable workflows |
Credit: www.electronicshub.org

Frequently Asked Questions For How To Screenshot On Hp Laptop
How Do You Take Screenshots On An Hp Laptop?
To take screenshots on an HP laptop, press the “Windows” key and “Print Screen” key simultaneously. The screenshot will be saved in the “Pictures” folder under the “Screenshots” subfolder.
How Do I Take A Screenshot On My Laptop?
To take a screenshot on your laptop, press the “PrtScn” key typically located on the top row. Then paste the screenshot into an image editing program or document.
How Do You Screenshot On A Hp Laptop Without Prtscn?
To screenshot on a HP laptop without PrtScn, use the Snipping Tool or Snip & Sketch app. Press “Windows” + “Shift” + “S” to capture and save a part of the screen. Alternatively, use the “Fn” + “Windows” + “spacebar” keys to take a screenshot.
Where Is Screenshot Button On Hp Keyboard?
The screenshot button on an HP keyboard is usually located near the top right corner. It may be labeled as “PrtScn” or “Print Screen” and is often used in conjunction with the “Fn” key. Pressing “Fn + PrtScn” captures a screenshot of the entire screen.
Conclusion
In a few simple steps, you can effortlessly capture screenshots on your HP laptop. Master the art of screenshotting to enhance your productivity and communication. Practice makes perfect, so keep practicing to become a tech-savvy pro in no time. Don’t miss out on this valuable skill!