To pair Raycon headphones, simply follow the instructions provided in the user manual. Raycon headphones offer an easy and straightforward pairing process that ensures a seamless connection with your device.
Introducing new technology into your audio experience can be exciting, but figuring out how to pair your new Raycon headphones can sometimes feel like a daunting task. However, with Raycon, the process is designed to be simple and hassle-free. We will guide you through the exact steps to pair your Raycon headphones, allowing you to enjoy your favorite music or podcasts in no time.
Whether you are a tech-savvy individual or someone who is not so familiar with gadgets, the instructions provided in the user manual will help you establish a seamless connection between your headphones and your device.
Credit: www.walmart.com
Setting Up Raycon Headphones For Pairing
Welcome to our step-by-step guide on how to set up your Raycon headphones for pairing. Whether you’re using them for the first time or connecting them to a new device, this tutorial will walk you through the process. Follow these simple instructions to get your headphones up and running in no time.
Charging The Headphones
Before pairing your Raycon headphones, ensure they are adequately charged. Follow these steps to charge your headphones:
- Locate the USB charging cable provided with your headphone purchase.
- Connect one end of the USB cable to the charging port on the headphones.
- Connect the other end of the USB cable to a power source such as a laptop, wall adapter, or power bank.
- Allow the headphones to charge for the recommended period stated in the user manual. This usually takes around two hours.
- Once the headphones are fully charged, disconnect the USB cable from both the headphones and the power source.
Powering On The Headphones
After charging your headphones, it’s time to power them on. Follow these steps to turn on your Raycon headphones:
- Locate the power button on your Raycon headphones.
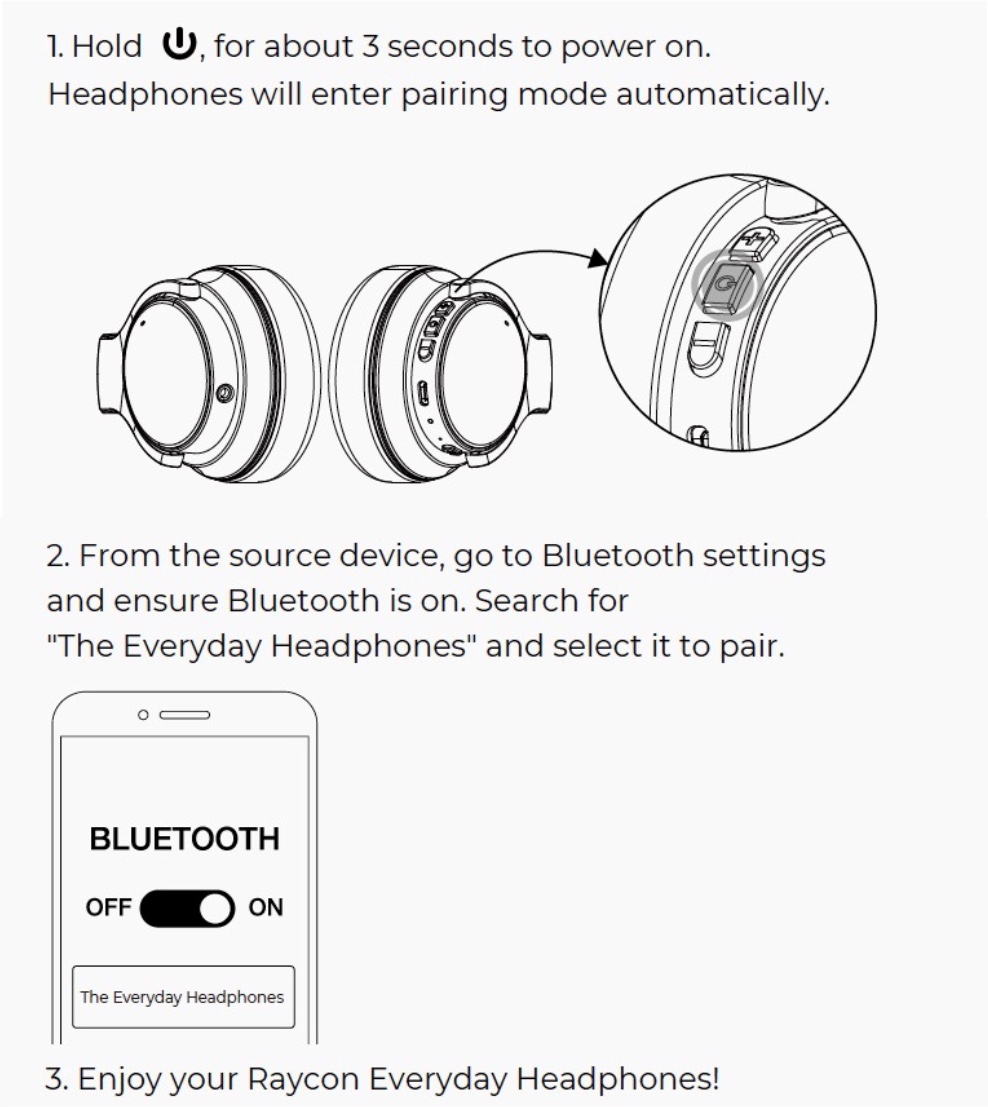
- Press and hold the power button for a few seconds until the LED indicator light turns on. This indicates that the headphones are now powered on.
- Release the power button and wait for the headphones to enter pairing mode.
- Once in pairing mode, the LED indicator light will start flashing, indicating that the headphones are ready to connect to a device.
Once your Raycon headphones are powered on and in pairing mode, you can proceed to connect them to your desired device using the specific method outlined in the device’s user manual.
That’s it! You have successfully set up your Raycon headphones for pairing. Now you can enjoy the wireless freedom and high-quality sound they offer. If you encounter any issues during the setup process, refer to the troubleshooting section in the user guide or contact Raycon customer support for assistance.

Credit: rayconglobal.com
Pairing Raycon Headphones With Bluetooth Devices
Raycon headphones offer a convenient and wireless way to enjoy your favorite music or take hands-free calls. To get started, you need to pair your Raycon headphones with your Bluetooth-enabled devices. In this section, we will guide you through the process step-by-step, ensuring you can seamlessly connect your headphones with ease.
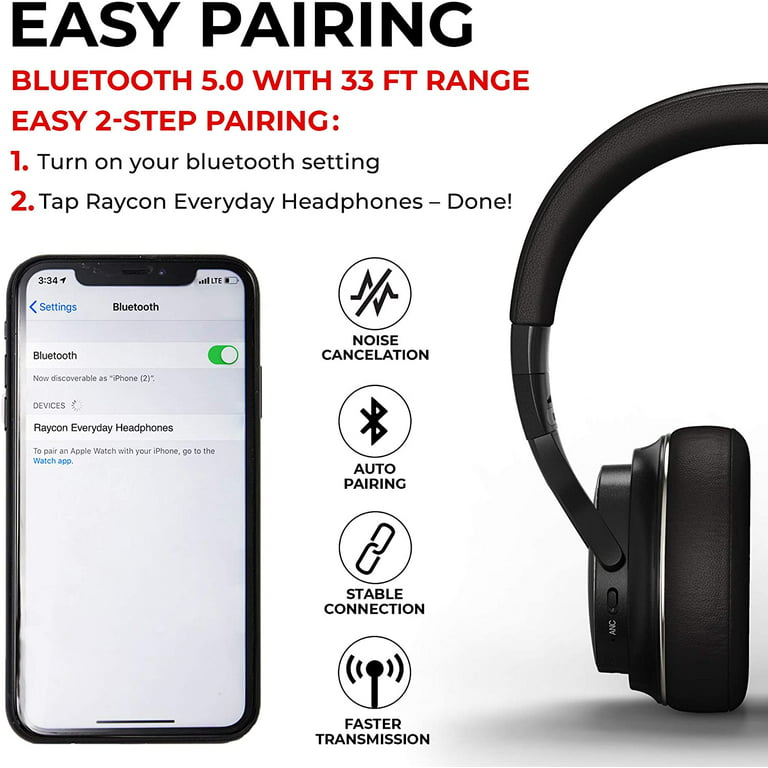
Activating Bluetooth On The Device
Before you can pair your Raycon headphones with a Bluetooth device, you need to ensure that Bluetooth is activated on the device itself. Here’s how:
- Unlock your device and go to the Settings menu.
- Look for the Bluetooth option and tap on it.
- Toggle the Bluetooth switch to the ON position.
Now that Bluetooth is activated on your device, you’re ready to put your Raycon headphones into pairing mode.
Entering Pairing Mode On The Headphones
To enter pairing mode on your Raycon headphones, follow these simple steps:
- Ensure your headphones are turned off.
- Press and hold the power button for 3-5 seconds.
- You will see a flashing LED light indicating that your headphones are now in pairing mode.
With your headphones in pairing mode and Bluetooth activated on your device, it’s time to establish the connection between the two.
Connecting The Device To The Headphones
Now that both your device and headphones are ready, you can connect them together:
- Go back to your device’s Bluetooth settings.
- Locate the available devices and select the one that matches your Raycon headphones model.
- If prompted, enter the passcode or PIN that came with your headphones. (Refer to the user manual for the specific code).
- Once connected, you will see a confirmation message on your device, indicating a successful pairing.
And that’s it! You have successfully paired your Raycon headphones with your Bluetooth device. Enjoy your wireless listening experience and feel free to adjust the volume or control playback directly from your headphones.
Troubleshooting Pairing Issues
Pairing your Raycon headphones with your device should be a seamless experience. However, on rare occasions, you may encounter some pairing issues that prevent a successful connection. In this troubleshooting guide, we will explore some common problems and provide you with simple solutions to get your headphones paired and ready to use.
Checking Bluetooth Compatibility
Before diving into troubleshooting steps, it’s important to ensure that your device is compatible with Bluetooth technology. The compatibility of Bluetooth versions can sometimes be an issue, especially when pairing older devices with newer headphones or vice versa.
You can check the compatibility of your device’s Bluetooth version in the settings. Here’s how:
- Go to the settings menu of your device.
- Navigate to the “Bluetooth” section.
- Look for the Bluetooth version mentioned. It is usually mentioned as “Bluetooth X.X”, with X being the version number.
If your device’s Bluetooth version is not compatible with your Raycon headphones, you may need to consider using an intermediary device, such as a Bluetooth transmitter, to establish a successful connection.
Resetting The Headphones
If your Raycon headphones are still failing to pair after ensuring Bluetooth compatibility, a simple reset might solve the problem. Here’s how you can reset your Raycon headphones:
- Locate the power button on your headphones. It is usually located on the side or bottom of one of the earbuds.
- Press and hold the power button for at least 10 seconds.
- You may see LED indicators flashing or hear a voice prompt indicating that the reset was successful.
After resetting your headphones, try pairing them with your device again. This should clear any temporary glitches and allow for a successful connection.
Clearing Device Pairing History
If you have previously paired your Raycon headphones with multiple devices, it is possible that your headphones are still trying to connect with a previously paired device, causing issues with the current pairing process. Clearing the device pairing history can help resolve this problem. Here’s how:
- Put your Raycon headphones in pairing mode. This is usually done by turning off the headphones, then pressing and holding the power button for a few seconds until you see the LED indicators flashing.
- On your device, go to the Bluetooth settings menu.
- Look for the list of paired devices and locate your Raycon headphones.
- Select your Raycon headphones and choose the option to “Forget” or “Remove” the device.
Once you have cleared the pairing history, attempt to pair your headphones with your device once again. This should eliminate any conflicts and allow for a successful connection.
Using Raycon Headphones With Multiple Devices
Pairing your Raycon headphones with multiple devices is a breeze. Simply follow the easy steps provided in the user manual to enjoy seamless wireless connectivity across all your favorite devices. Whether it’s your smartphone, tablet, or laptop, these headphones are designed to effortlessly pair with them all.
Raycon headphones offer a seamless wireless audio experience, allowing you to enjoy your favorite music or podcasts without any restrictions. One of the great advantages of these headphones is their ability to connect with multiple devices. Whether you want to pair them with your smartphone, tablet, or computer, the process is quick and simple. In this article, we will guide you through the steps of pairing Raycon headphones with additional devices and switching between them effortlessly.
Pairing With Additional Devices
To pair your Raycon headphones with additional devices, follow these steps:
- Ensure that your first device is disconnected from the headphones or Bluetooth turned off.
- Put your Raycon headphones in pairing mode by turning them on and holding the power button for 5 seconds until the LED light starts flashing.
- On your second device, go to the Bluetooth settings and search for available devices.
- Locate your Raycon headphones on the list of available devices and select them to establish a connection.
- Once connected, you can now enjoy your audio seamlessly on the second device.
- If you wish to pair the headphones with more devices, repeat the steps above.
Switching Between Paired Devices
If you have already paired your Raycon headphones with multiple devices, switching between them is hassle-free. Here’s how:
- Make sure both devices are within the Bluetooth range of the headphones.
- Pause or stop the audio playback on the current device.
- On the new device, start playing audio or enable Bluetooth if necessary.
- Your Raycon headphones will automatically connect to the new device, and the audio will seamlessly switch over.
- No need to manually disconnect or reconnect; the headphones intelligently handle the switching process.
- Enjoy your audio without any interruptions as you effortlessly switch between your paired devices.
Managing Connected Bluetooth Devices
Pairing your Raycon headphones with your Bluetooth device is a breeze. Simply follow these steps for seamless connection and enjoy your wireless listening experience.
Removing Or Unpairing Devices
When it comes to managing your connected Bluetooth devices, one important task you may encounter is removing or unpairing devices. Whether you want to disconnect a device that you no longer use or you need to make space for a new device, the process is straightforward and can be done in a matter of seconds.
To remove a device from your list of paired devices, follow these simple steps:
- Go to the Bluetooth settings on your device.
- Locate the device you wish to remove from the list of paired devices.
- Click or tap on the settings icon next to the device’s name.
- From the options that appear, select “Forget” or “Unpair” to disconnect the device.
By following these steps, you’ll be able to easily remove any unwanted or unnecessary devices from your list of connected Bluetooth devices, ensuring a clean and organized setup.
Renaming Paired Devices
Keeping track of multiple Bluetooth devices can sometimes be a challenge, especially when they all have generic names like “Headphones” or “Speaker.” Fortunately, you have the option to rename your paired devices to make them more easily identifiable.
Here’s how you can rename your paired devices:
- Open your Bluetooth settings on your device.
- Find the device you want to rename in the list of paired devices.
- Click or tap on the settings icon next to the device’s current name.
- Select the option to rename the device.
- Enter the desired name for the device and save the changes.
By giving your devices unique and meaningful names, you can quickly identify and connect to the right device without any confusion.

Credit: rayconglobal.com
Frequently Asked Questions On How To Pair Raycon Headphones
How Do I Put My Raycons In Pairing Mode?
To put your Raycons in pairing mode, simply open the Bluetooth settings on your device and select “Pair a new device. ” Then, press and hold the pairing button on your Raycons until the LED light flashes blue and white.
Your Raycons are now in pairing mode.
Why Are My Raycons Flashing Green?
Your Raycons are flashing green because it indicates that they are in pairing mode.
Why Won’t My Raycon Fitness Headphones Turn On?
If your Raycon fitness headphones won’t turn on, ensure that the battery is properly charged. Try resetting the headphones or using a different charging cable. Contact customer support if the issue persists.
What Does The Red Light On Raycons Mean?
The red light on Raycons indicates that the earbuds are charging or have a low battery.

Conclusion
Pairing your Raycon headphones is a simple process that enables you to enjoy your favorite tunes hassle-free. With the step-by-step instructions provided in this guide, you can easily connect your headphones to your device and experience high-quality sound. Remember to refer back to this post whenever you need a refresher.
So, immerse yourself in the world of music with your new Raycon headphones and enjoy the ultimate auditory experience!